The Day of the Dead, or Dia de los Muertos, is a vibrant and meaningful Mexican cultural celebration with roots in Mesoamerican indigenous cultures.
It has also found its way into the hearts and traditions of many in the United States.
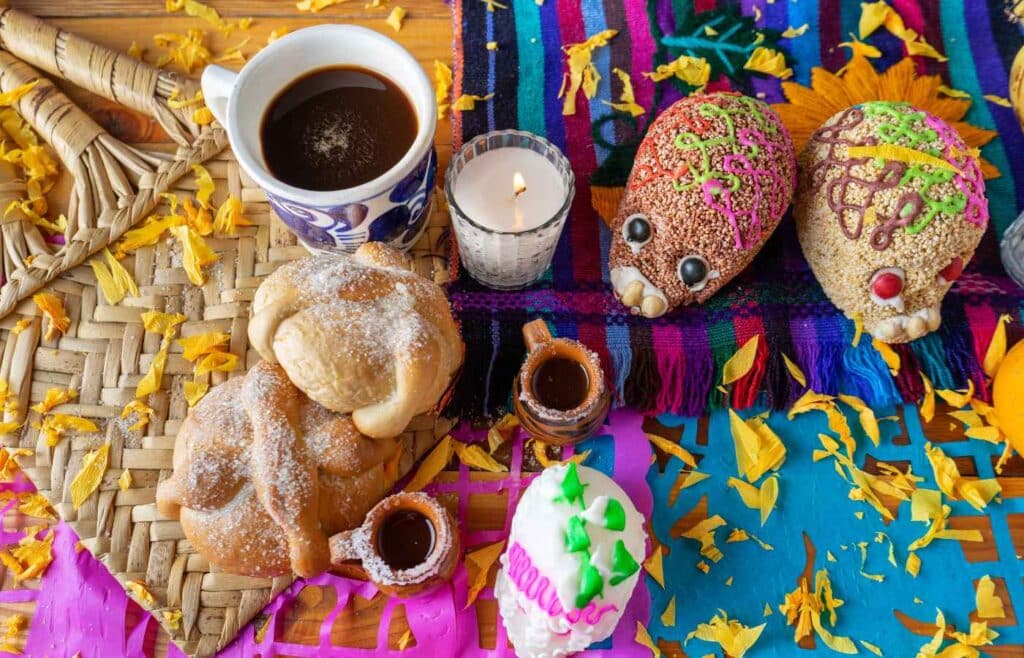
This joyous two-day celebration, held on November 1st and 2nd, is filled with rich symbolism and colorful traditions, offering families and communities an opportunity to remember and honor loved ones who have passed away.
In this blog post, we’ll explore captivating Day of the Dead activities you can do with your kids to celebrate this cherished holiday from Mexican culture.
From intricate ofrendas to vibrant face painting and traditional foods, here are some Dia de los Muertos activities to immerse yourself in the beauty of this holiday:
1. Ofrenda Creation
At the heart of any Day of the Dead celebration lies the creation of an ofrenda, or altar, which serves as a heartfelt tribute to deceased loved ones.
This meaningful tradition allows families to come together and honor the memory of those who have passed away.
Here’s how you can create a beautiful dia de los muertos altar with your family:
Select a Sacred Space: Choose a dedicated space in your home, such as a table or surface, to build your ofrenda. This space should be easily accessible to family members and provide a tranquil atmosphere for reflection.
Colorful Cloth: Begin by covering the chosen surface with a vibrant and colorful cloth. The bright and cheerful colors are symbolic of the celebration and the lively spirits of Dia de los Muertos.
Marigold Flowers (Cempasúchil): Marigold flowers, known as “cempasúchil” in Spanish, play a central role in Dia de los Muertos. Their bright colors are believed to guide the spirits of the deceased back to the living world with their vibrant colors and sweet scent. Place marigold bouquets in vases or as garlands on your ofrenda, creating a fragrant pathway for the returning souls.
Candles: Light plays a significant role in Dia de los Muertos, symbolizing hope and remembrance. Arrange candles of various sizes and colors on the ofrenda to guide the spirits and provide warmth. You can use traditional votive candles, tea lights, or even tall taper candles.
Sugar Skulls (Calaveras de Azúcar): Sugar skulls are iconic symbols of Día de Muertos. They represent the cyclical nature of life and death, reminding us to celebrate the lives of those who have passed. Include sugar skulls on your ofrenda, either store-bought or handmade by your family. Decorating them with colorful icing is a delightful activity for children.
Photographs of Deceased Family Members: Personalize your ofrenda by placing framed photographs of your departed loved ones. These photographs serve as a direct connection to the individuals being honored and help keep their memory alive during the celebration.
Favorite Foods and Drinks: Another essential element of the ofrenda is the inclusion of the deceased’s favorite foods and beverages. Place their preferred dishes, fruits, candies, or even a favorite drink on the altar. It’s believed that the aroma of these offerings will attract and nourish the spirits.
Incense and Copal: Burning incense, particularly copal resin, is a common practice during Dia de los Muertos. It purifies the space and releases a fragrant smoke that is thought to elevate prayers and messages to the spirits.
Personal Belongings: Some families include personal belongings or mementos of the departed on their Day of the Dead altar, such as clothing, jewelry, or cherished possessions. These items add a personal touch and further connect the living and the deceased.
Papel Picado: Decorate your ofrenda with papel picado, which are intricately cut paper banners. These delicate decorations symbolize the wind and the fragility of life. Hang them above the altar to add a touch of elegance and symbolism.
2. Sugar Skulls
Sugar skulls are an iconic Dia de los Muertos symbol, representative of deceased loved ones, celebrating their lives and honoring their memory.
Let your kids create, design and decorate their own calaveras de azúcar, adding vibrant colors and patterns.
This hands-on activity is a great way to teach young children about the tradition that also allows for artistic expression.
Step 1: Make Sugar Mixture
The sugar mixture used for making sugar skulls typically consists of granulated sugar and water. Here’s a simple recipe for the sugar mixture:
Ingredients:
2 cups granulated sugar
2 teaspoons meringue powder
2 teaspoons water
Instructions:
In a mixing bowl, combine the granulated sugar and meringue powder. Meringue powder helps the sugar mixture bind together and harden.
Gradually add the water while stirring the mixture. Continue to mix until the sugar mixture reaches a dough-like consistency. It should be moist enough to hold its shape when pressed together but not overly wet.
Knead the sugar mixture with your hands for a few minutes until it becomes smooth and pliable. If it’s too dry, you can add a little more water, one teaspoon at a time, until it reaches the desired consistency.
Once the sugar mixture is ready, you can use it to press into sugar skull molds to create the skull shapes. Pack the mixture firmly into the molds, then carefully remove the formed sugar skulls.
Allow the sugar skulls to dry and harden, which can take several hours to a day or more, depending on the size and thickness of the skulls. Once they are completely dry, they are ready to be decorated with colorful icing.
Step 2: Gather Materials
Sugar skull molds (readily available at craft stores or online)
A variety of icing in vivid colors (red, orange, yellow, etc.)
Icing bags or small containers for decorating
Step 3: Prepare the Sugar Skulls
Let children pack the sugar mixture into the molds and carefully remove the formed sugar skulls.
Explain that the sugar mixture is not only a delicious treat but also a way to convey love and remembrance.
Step 4: Creative Decorating
Use colorful icing to create intricate patterns, floral designs, hearts, or replicate traditional Dia de los Muertos motifs. Emphasize that their creations are unique and a way to pay tribute to loved ones.
Suggest adding personal elements to their sugar skulls like writing the names of departed family members.
Step 5: Display with Pride
Once the sugar skulls are beautifully decorated and dry, display them proudly. Place them on your Dia de los Muertos ofrenda (altar) or another dedicated space.
Step 6: Savor the Tradition
Finally, enjoy the sweet taste of your decorated sugar skulls together as a family.
3. Tissue Paper Marigold Flowers
Paper marigolds, or “cempasúchil” flowers, are a vibrant and symbolic element of Dia de los Muertos celebrations. Marigolds are thought to guide the spirits with their bright colors.
Creating these paper flowers is one of the easiest día de los muertos activities, and one of the best ways to add a touch of tradition and color to your altar or decorations.
Here’s a step-by-step guide on how to make paper marigolds:
Materials You’ll Need:
Orange, yellow, and green tissue paper or crepe paper
Scissors
Green pipe cleaners or floral wire
Pencil or dowel (optional)
Step 1: Cut Rectangular Strips
Start by cutting rectangular strips of orange and yellow tissue paper. These strips will serve as the petals for your marigolds.
You can vary the size of the strips to create marigolds of different sizes.
Step 2: Layer the Strips
Take a few strips of orange paper and stack them on top of each other.
Then, take a few strips of yellow paper and stack them on top of the orange strips.
Step 3: Accordion Fold
Begin accordion-folding the layered strips. Make narrow folds (about 1 inch wide) back and forth, like you’re creating a fan.
Continue folding until you’ve folded the entire stack of strips.
Step 4: Secure the Center
Once the accordion fold is complete, secure the center of the folded paper with a green pipe cleaner or floral wire.
Twist the pipe cleaner or wire around the center tightly to hold the folded paper in place.
Step 5: Round the Petals
Carefully round the ends of the folded paper to create a flower shape. Trim the ends into a rounded or pointy petal shape, depending on your preference.
Step 6: Separate the Petals
Gently separate and fluff the layers of paper to form the marigold’s petals. Start with the outermost layer and work your way inwards.
Be cautious not to tear the delicate paper as you separate the layers.
Step 7: Shape the Stem
If you’d like to create a stem for your paper marigold, take a green pipe cleaner and wrap it around the base of the flower.
Leave some extra length at the bottom to mimic the stem of a real marigold.
Step 8: Arrange and Display
Once you’ve made your paper marigolds, arrange them in your Dia de los Muertos ofrenda, garlands, or decorations.
The vibrant orange and yellow hues of the paper marigolds will not only add beauty to your celebration but also symbolize the marigold flowers believed to guide the spirits of the departed.
Creating paper marigolds is a simple yet meaningful craft activity that allows you to infuse your Dia de los Muertos celebration with the traditional colors and symbolism of this special holiday.
4. Make Calacas (Skeletons)
Creating calacas, or skeletons, with kids can be a delightful and educational way to celebrate Dia de los Muertos.
These playful skeletons represent the idea that death is a natural part of life that should be celebrated rather than feared, they offer a fun way for kids to celebrate this traditional Mexican holiday.
Here’s a step-by-step guide:
Materials You’ll Need:
Paper cutouts of skeleton shapes (you can provide these or find templates online)
Markers, colored pencils, or crayons
Scissors
Craft sticks or straws
Glue or tape
Decorative materials (optional, like sequins, googly eyes, yarn, or fabric scraps for dressing up the calacas)
Step 2: Cut out and assemble the Calaca
Step 3: Decorate the Calacas
Encourage kids to unleash their creativity by decorating their skeleton cutouts. They can use markers, colored pencils, or crayons to add details like facial features, clothing, and accessories.
It’s also fun to suggest dressing up the calacas as certain people, celebrities, or fictional characters. This adds an element of imagination and personalization to the activity.
Step 4: Add Embellishments (Optional)
Provide optional embellishments like sequins, googly eyes, yarn for hair, or fabric scraps for clothing. Kids can use these materials to enhance the appearance of their calacas, making them even more unique.
Step 5: Attach Craft Sticks or Straws
To transform the calacas into puppets or decorations, attach craft sticks or straws to the back of the paper skeletons. Use glue or tape to secure them firmly.
These handles make it easy for kids to hold and play with their calacas.
Step 6: Share and Celebrate
Once the calacas are complete and dry, gather the children to share their creations. Encourage them to explain the design choices they made, the characters they dressed up their calacas as, and any symbolism they incorporated.
Display the calacas around your Dia de los Muertos ofrenda or as decorations to celebrate the holidays.
5. Papel Picado
Papel picado, or perforated paper banners, are intricate and vibrant decorations often seen during Dia de los Muertos celebrations. These delicate creations can be a wonderful and culturally significant craft project to engage children in the festivities. Here’s how:
Materials You’ll Need:
Colored tissue paper or colored construction paper
Scissors
Pencil
Ruler
Craft punch (optional, but it makes creating intricate designs easier)
String or twine
Hole punch
Glue or tape
Step 1: Understand the Cultural Significance
Before you begin, explain to the kids the cultural importance of papel picado in Dia de los Muertos. Papel picado represents the wind and the fragility of life. The intricate designs also add a festive and decorative element to the celebrations.
Step 2: Choose Colors and Paper
Let the children select the colors of tissue paper or construction paper they’d like to use. A vibrant color is best. Traditional colors for Dia de los Muertos include bright oranges, yellows, pinks, and purples, but feel free to get creative with other colors too.
Step 3: Fold the Paper
Start with a large sheet of paper, and fold it in half to create a rectangle. Explain that the folded edge will be the bottom of the banner, and the open edge will be the top.
Step 4: Create a Design Template
Using a pencil and a ruler, help the kids create a design template on the folded paper. These designs can include skulls, flowers, crosses, and other Dia de los Muertos symbols. It’s a great opportunity to discuss the meaning behind these symbols with the children.
Step 5: Cut Out the Designs
Carefully cut out the designs along the lines of the template. This step requires patience and precision, so adult supervision or assistance may be necessary, especially for younger children.
If you have craft punches with Dia de los Muertos designs, they can be a fun and easy way to create intricate patterns.
Step 6: Unfold and Assemble
Once all the designs are cut, carefully unfold the paper. You’ll reveal a beautiful papel picado banner with symmetrical designs.
Step 7: Add Holes for Hanging
Use a hole punch to create small holes along the top edge of the banner. These holes will be used to thread string or twine through for hanging.
Step 8: String and Display
Thread a string or twine through the punched holes, and your papel picado is ready to be displayed. Hang it across doorways, windows, or along your Dia de los Muertos ofrenda.
6. Bake Pan de Muerto
Pan de Muerto, or Bread of the Dead, is a cherished and delicious treat that holds a special place in Dia de los Muertos celebrations.
It’s a sweet bread that’s offered to honor and remember deceased loved ones. The round shape represents the cycle of life, and the dough decorations symbolize bones and tears.
Baking it with kids can be a wonderful way to immerse them in the cultural traditions of this holiday while enjoying a delightful culinary experience. Here’s how:
Step 1: Gather Your Materials
4 cups all-purpose flour
1/2 cup sugar
1 teaspoon salt
1 tablespoon active dry yeast
3/4 cup warm milk
1/2 cup unsalted butter, melted
4 large eggs
1 teaspoon orange blossom water (optional)
Zest of one orange
Sliced almonds (for decoration)
Powdered sugar (for dusting)
Step 2: Mix the Dry Ingredients
In a large mixing bowl, combine the flour, sugar, and salt. Discuss the ingredients and their role in creating the bread while involving the kids in measuring and pouring.
Step 3: Activate the Yeast
In a separate bowl, dissolve the yeast in warm milk. Talk about how the yeast helps the bread rise and discuss the science behind it. Let the kids observe the mixture as it becomes frothy.
Step 4: Combine Wet Ingredients
In another bowl, whisk together the melted butter, eggs, orange blossom water (if using), and orange zest. Explain how these ingredients add flavor and richness to the bread.
Step 5: Knead the Dough
Gradually add the yeast mixture to the dry ingredients, followed by the wet ingredient mixture. Combine everything to form a dough. Explain that kneading the dough is like giving it a gentle massage.
Step 6: Shape the Bread
Divide the dough into two portions. Take one portion and shape it into a round loaf with a smooth top. Discuss how this shape represents the circle of life. Place it on a baking sheet lined with parchment paper.
Step 7: Add Dough Decorations
For the traditional Pan de Muerto look, show the kids how to create bone-shaped pieces from the remaining dough and arrange them in a cross shape on top of the loaf. Explain that these decorations symbolize bones.
Step 8: Let It Rise
Cover the loaf with a clean kitchen towel and let it rise in a warm place for about an hour. Discuss how the dough will expand during this time, just as life continues.
Step 9: Preheat and Bake
Preheat the oven to 350°F (180°C). Before placing the bread in the oven, demonstrate how to gently brush the top with beaten egg and decorate it with sliced almonds. Explain that these almonds represent tears shed for the deceased.
Step 10: Bake and Enjoy
Bake the bread for approximately 30-35 minutes, or until it’s golden brown and sounds hollow when tapped on the bottom.
Once baked and cooled, dust the Pan de Muerto with powdered sugar to represent the dust of the earth.
Finally, share this delicious bread as a family, discussing the memories of loved ones and the meaning of Dia de los Muertos.
7. Calavera Face Painting
Calavera face painting is a cherished Dia de los Muertos tradition celebrating the cycle of life and honors loved ones who have passed. The colorful skulls symbolize joy, remembrance, and acceptance of death.
Materials Needed:
Face paints or makeup in vibrant colors.
Fine-tipped brushes and sponges.
A mirror.
Reference images for inspiration (optional).
Step-by-Step Guide:
Prepare and Cleanse: Start with a clean, dry face. Moisturize lightly for a smooth canvas.
White Base: Apply white face paint all over. It represents the purity of departed souls.
Eye Sockets: Use black paint to create eye sockets. Make them round or almond-shaped.
Nose and Mouth: Paint the nose black and craft a whimsical smile in red or yellow. Add black lines for teeth.
Decorative Elements: Get creative with patterns, swirls, and colors on the cheeks, chin, and forehead.
Eye Designs: Paint colorful floral or geometric patterns around the eyes, with long eyelashes.
Forehead Decoration: Add intricate designs, like a cempasúchil flower or sun-like patterns.
Cheek Accents: Decorate with hearts, flowers, or personal symbols.
Review and Touch Up: Check in the mirror for symmetry and make any necessary adjustments.
Seal and Set: Preserve the face paint with setting spray or translucent powder.
8. Candelaria
Day of the Dead candelarias are used to hold candles or votive candles. These candle holders are an essential part of creating a festive and reverent atmosphere on ofrendas (altars) and during other Day of the Dead festivities. Here’s how to make your own Day of the Dead candle holders:
Materials You’ll Need:
Glass or ceramic candle holders: You can repurpose old candle holders or purchase plain ones from a craft store.
Acrylic paints: In vibrant colors like black, white, red, yellow, blue, and green.
Paintbrushes: Fine-tipped brushes for intricate details.
Water and a palette: To mix and dilute paints as needed.
Toothpicks: For adding fine details and patterns.
Clear varnish or sealant: To protect the paint and give a glossy finish (optional).
Step-by-Step Guide:
Plan Your Design:
Decide on the design for your Day of the Dead candle holders. You can draw inspiration from traditional calavera (skull) designs or create your own unique patterns and motifs.
Paint the Base Coat:
Start by painting the entire candle holder with a base coat of white paint. This will help the colors stand out and give a uniform background.
Create Your Design:
Use acrylic paints to add vibrant colors and intricate details to your candle holders. Common motifs include sugar skulls, marigold flowers, hearts, and decorative patterns.
Add Facial Features:
If you’re painting a sugar skull design, add the facial features such as the eyes, nose, and mouth. You can make them as detailed or as whimsical as you like.
Incorporate Patterns and Accents:
Use toothpicks to add fine lines, dots, and other decorative elements to your candle holders. Traditional Mexican folk art often features intricate patterns and designs.
Let It Dry:
Allow the paint to dry completely before moving on to the next step. This may take a few hours or more, depending on the thickness of the paint.
Optional Varnish:
If you want to protect the paint and give your candle holders a glossy finish, you can apply a clear varnish or sealant according to the product’s instructions. This step is optional but can enhance the appearance and durability of your candle holders.
Place Candles:
Once your Day of the Dead candle holders are complete and dry, place candles or votive candles in them. Be sure to use flameless LED candles if you’re concerned about safety.
Display and Enjoy:
Arrange your decorated candle holders on your Dia de los Muertos ofrenda, dining table, or any other area where you want to create a festive and reverent atmosphere.
9. Day of the Dead Pumpkin Craft
Materials You’ll Need:
Pumpkin: You can use either a real or artificial pumpkin. Artificial pumpkins are reusable for future celebrations.
Acrylic paint: This will be used to paint the pumpkin.
Paintbrushes: For applying the paint.
Tissue paper or colorful napkins: Choose tissue paper or napkins with vibrant Day of the Dead designs, such as sugar skulls, marigold flowers, or calavera patterns.
Mod Podge or decoupage glue: This adhesive and sealant will help you attach the tissue paper to the pumpkin.
Foam brushes or paintbrushes: For applying Mod Podge and smoothing out the tissue paper.
Scissors: To cut out the tissue paper or napkin designs.
Craft knife (optional): Useful for trimming excess tissue paper.
Ribbon or embellishments (optional): You can add decorative touches like ribbon bows, artificial flowers, or gemstones.
Step-by-Step Guide:
Prepare Your Workspace:
Cover your work surface with newspaper or a disposable tablecloth to protect it from paint and glue.
Paint the Pumpkin Black or White:
Use a paintbrush to coat the entire pumpkin with black acrylic paint. Allow it to dry completely. You may need to apply a second coat for full coverage.
Cut Tissue Paper or Napkin Designs:
Carefully cut out the Day of the Dead designs from the tissue paper or napkins. Select specific elements like sugar skulls or marigold flowers.
Apply Mod Podge:
Use a foam brush to apply a thin layer of Mod Podge onto a small section of the pumpkin where you want to place your first tissue paper design.
Place the Tissue Paper:
Gently press the cut tissue paper or napkin design onto the Mod Podge-covered area. Smooth it out with your fingers or the foam brush to remove any wrinkles or air bubbles.
Repeat the Process:
Continue applying Mod Podge to small sections of the pumpkin and attaching tissue paper or napkin designs until you cover the entire black surface. Overlapping designs can create a layered effect.
Seal and Protect:
Once all the designs are in place and the Mod Podge is dry, apply a thin layer of Mod Podge over the entire pumpkin to seal the tissue paper and give it a glossy finish. Allow it to dry completely.
Add Embellishments (Optional):
If desired, enhance your Día de los Muertos decoupage pumpkin with decorative elements like ribbon bows, artificial flowers, or gemstones. Use hot glue or additional Mod Podge to attach them securely.
Display Your Craft:
Your Día de los Muertos DIY decoupage pumpkin, with its black base and Day of the Dead decorations, is now ready to be displayed as a striking and festive decoration for your Dia de los Muertos altar or Halloween decor.
10. Paper Plate Mask
Craft vibrant Dia de los Muertos paper plate masks with your kids!
These easy-to-make masks feature traditional Calavera (skull) designs and allow young artists to embrace the colorful spirit of the holiday while expressing their creativity. Perfect for Dia de los Muertos celebrations and costume fun.
11. Watch Coco (2017)
“Coco” is an animated film by Disney-Pixar that follows the journey of a young boy named Miguel as he explores the Land of the Dead during Dia de los Muertos. This heartwarming film beautifully captures the spirit of the holiday and its emphasis on family, music, and remembrance.
12. Listen to Mariachi Music
Mariachi bands are an integral part of Dia de los Muertos celebrations. Mariachi music is lively and features instruments such as the guitar, trumpet, violin, and vihuela. Kids can enjoy the energetic rhythms and catchy melodies of Mariachi songs.
13. La Calavera Catrina Dance
The iconic “Catrina” is a famous Dia de los Muertos figure, and a dance inspired by her character often takes place during celebrations. Dancers dress elegantly as La Catrina and perform graceful movements. Have kids watch examples on Youtube.
14. DIY Catrina Dolls
Create miniature Catrina dolls using paper mache or other craft supplies and clothespin dolls.
15. Watch The Book of Life (2014)
This colorful and visually stunning animated film tells the story of a young man named Manolo who embarks on an epic adventure through the Land of the Remembered and the Land of the Forgotten. It incorporates Dia de los Muertos traditions and themes while delivering a unique and engaging story.
16. DIY Pumpkin Shadow Box by Crafty Chica
17. Mini Altar
If you don’t have the space or materials for a full-size altar, you can make a sweet miniature version using the instructions here:
18. DIY Corona (Crown)
Create your own Dia de los Muertos crown! This delightful craft activity allows kids to design and decorate their own festive crowns adorned with marigold flowers, sugar skulls, and vibrant colors, adding an extra touch of flair to your Dia de los Muertos celebrations.
19. Aluminum Wire Skeleton
Craft an aluminum wire skeleton for Dia de los Muertos! This imaginative project lets kids bring the spirit of the holiday to life by shaping and decorating their own skeleton figures using flexible aluminum wire, a perfect addition to your Day of the Dead decorations.”
20. Day of the Dead Wreath
Craft a stunning Day of the Dead wreath! Let your kids design and assemble a vibrant and symbolic wreath adorned with marigold flowers, sugar skulls, and other Dia de los Muertos elements. Hang it proudly as a festive decoration to honor and celebrate loved ones.
21. Lantern Shrine with Crafty Chica
Another charming way to make an altar is in a lantern. Here’s how to do it:
22. Origami Biting Skulls
Fold origami biting skulls for a playful Dia de los Muertos twist on traditional paper folding! Kids can enjoy creating these whimsical and spooky skull designs, perfect for adding a touch of Dia de los Muertos charm to their crafts and decorations
23. Shoebox Ofrenda
Craft a Shoebox Ofrenda for Dia de los Muertos! This imaginative project allows kids to create miniature ofrendas within shoeboxes, filled with symbolic items and personal touches to honor and remember loved ones in a unique and meaningful way.
24. Monarch Butterfly Origami
Fold your own Monarch Butterfly Origami! This craft beautifully symbolizes the connection between monarch butterflies and the Dia de los Muertos holiday.
Just as these butterflies migrate to Mexico during the Dia de los Muertos season, our origami butterflies add a touch of elegance and symbolism to your holiday decorations, representing the spirits of loved ones returning to celebrate with us.
25. Skeleton Puppets
Craft skeleton puppets with your children and put on a puppet show or play. This creative activity not only entertains the family but also allows kids to explore the whimsical side of Dia de los Muertos. They can give personalities to their puppets and create stories that honor the holiday’s themes.
More Day of the Dead Activities:
26. Cemetery Visit
Taking a family trip to the cemetery is a poignant Dia de los Muertos tradition. It’s a time to visit the resting places of departed loved ones, clean their graves, and adorn them with marigolds, candles, and other offerings.
This experience provides children with a tangible connection to the holiday’s reverence for those who have passed away and the importance of cherishing memories.
27. Storytelling
Storytelling is a heartwarming way to keep the spirits of departed family members alive in the hearts of children. Gather as a family and share stories, anecdotes, and cherished memories about those who have passed away.
Encourage your kids to ask questions and learn about their family’s history. It’s a beautiful way to celebrate the lives of loved ones and pass down the legacy of family traditions.
28. Skeleton Handprints
Trace your child’s handprints on black paper, cut them out, and decorate them as skeleton hands.
29. Calavera Coloring Pages
Print Dia de los Muertos-themed and sugar skull coloring pages for kids to color in.
30. Skull Rock Painting
Collect smooth rocks and paint them with skull designs.
31. Calavera Clay Sculptures
Sculpt sugar skulls or miniature skeletons from clay.
32. DIY Catrina Dolls
Create miniature Catrina dolls using craft supplies and clothespin dolls.
33. Sugar Skull Magnets
Craft sugar skull magnets by attaching printed designs to magnetic sheets.
34. Dia de los Muertos History Lesson
Explain the history and significance of the holiday to your children.
35. Spanish Language Practice
Introduce some Spanish vocabulary related to Dia de los Muertos.
36. Visit a Museum or Cultural Center
Explore local museums or cultural centers that feature Dia de los Muertos exhibits.
37. Research Ancestry
Encourage older kids to research their family tree and learn about their ancestors.
38. Marigold Planting
Plant marigold seeds in your garden as a symbol of remembrance.
39. Dia de los Muertos Parade or Festival
Attend a local Dia de los Muertos parade or festival if available.
40. Skeleton Pinata
Make or purchase a skeleton pinata for a fun party game.
41. Luminaria Pathway
Light up your driveway or garden with luminarias (non flameable candles in paper bags).
42. Catrina Costume Party
Host a Day of the Dead party where kids dress up as elegant Catrinas and paint their faces.
43. Dia de los Muertos Face Masks
Decorate face masks with calavera or marigold designs.
44. Virtual Ofrenda
Create a virtual ofrenda online where family members from afar can contribute photos and memories.
45. Altar Photo Frame Craft
Create small, decorative photo frames using craft sticks or cardboard. Place photos of deceased family members inside and use them to adorn your ofrenda.
46. Family Tree
Assemble a family tree creating a calaca / calavera dressed as each family member on the tree.
47. Copal Bead Bracelets
Create Dia de los Muertos-themed bracelets using copal beads. You can mix these beads with colorful ones, such as those resembling marigold flowers and sugar skulls, to represent the holiday’s symbols. Each family member can make their bracelet to wear during the festivities.
48. Calavera Collages
Make collages with pictures of family members who have passed and calavera-themed cutouts.
49. Day of the Dead Book
Immerse your kids about Day of the Dead with an engaging book about the holiday.
50. Day of the Dead Doggies
Use clay to sculpt Day of the Dead doggies.
While it may seem paradoxical, Day of the Dead is truly a celebration of life while commemorating the deceased.
This holiday is a beautiful reflection of the Mexican and Mesoamerican belief that death is a natural part of the human experience and should not be feared or mourned but embraced as a continuation of life’s cycle.
We hope these Dia de los Muertos crafts bring this important holiday to life for you and your family.
Related Posts
5 Family-Friendly Day of the Dead Events Around Milwaukee
Family Sunday at the Art Museum: Day of the Dead
25 Fun Facts About Cinco de Mayo For Kids
Calie Herbst, Editor-in-Chief of Milwaukee With Kids, has spent over a decade combining her experiences as a parent of three to create a hub for Milwaukee’s family adventures.
Her decade-long teaching career in Milwaukee Public Schools and academic background, including a Master’s in Teaching from Marquette University and dual B.A.s in Sociology and Spanish from the University of Wisconsin – Madison, fuel her passion for inclusive and engaging family content.
Calie is also a recognized voice in local media, contributing to WISN Channel 12 News, WTMJ Wisconsin Morning News, Fox 6’s Real Milwaukee, and B93.3.
Discover more about Calie’s journey and editorial approach on her About Page and Editorial Policy Page.
